OrbbecSDK_ROS2
Orbbec SDK ROS2 Wrapper
- Orbbec SDK ROS2 Wrapper
1.ROS1 And ROS2
The Orbbec SDK ROS2 Wrapper is the ROS2 wrapper for the Orbbec SDK. It provides ROS2 interfaces for the Orbbec 3D camera and is compatible with the ROS2 Foxy, Galactic, and Humble distributions.
For the ROS1 user, we also have a ROS1 version of the wrapper, which is compatible with the ROS1 Kinetic, Melodic, and Noetic distributions. For more information, please refer to the Orbbec SDK ROS wrapper repository.
2.Installation
2.1 Step 1: Install the ROS2 distribution
Please refer to the official guide:
- Ubuntu 20.04 LTS: Foxy
- Ubuntu 20.04 LTS: Galactic
- Ubuntu 22.04 LTS: Humble
- More guides for other ROS2 distributions and operating systems can be found here.
After installing ROS2, remember to source the environment by: Configuring-ROS2-Environment
If you cannot use the auto-complete feature, you can add the following two lines to your .bashrc or .zshrc file.
eval "$(register-python-argcomplete3 ros2)"
eval "$(register-python-argcomplete3 colcon)"
2.2 Step 2: Install dependencies
-
● Install dependent ROS2 packages
-
Install ROS packages by:
sudo apt install ros-$ROS_DISTRO-image-transport \ ros-$ROS_DISTRO-image-publisher \ ros-$ROS_DISTRO-camera-info-manager -
For example, for Humble distro:
sudo apt install ros-humble-image-transport \
ros-humble-image-publisher \
ros-humble-camera-info-manager
-
-
Install dependent libraries
sudo apt install libgflags-dev nlohmann-json3-dev libgoogle-glog-dev
2.3 Step 3: Install the Orbbec SDK ROS2 Wrapper
-
Create a ROS2 workspace
mkdir -p ~/ros2_ws/src # you can replace `~/ros2_ws` with your own workspace path -
Clone the latest OrbbecSDK ROS2 wrapper from here into
~/ros2_ws/src/cd ~/ros2_ws/src git clone https://github.com/orbbec/OrbbecSDK_ROS2.git -
Build
cd ~/ros2_ws/ colcon build --event-handlers console_direct+ --cmake-args -DCMAKE_BUILD_TYPE=Release -
Install udev rules file to get usb device access permission
cd ~/ros2_ws/src/OrbbecSDK_ROS2/orbbec_camera/scripts sudo bash install_udev_rules.sh sudo udevadm control --reload-rules && sudo udevadm trigger -
source environment (do this every time you open a new terminal)
  cd ~/ros2_ws/
  source ./install/setup.bash  # or source ./install/setup.zsh if you are using zsh
3.Usage
3.1 Overview
The Orbbec SDK ROS2 Wrapper is composed of 4 nodes, all buundled within the orbbec_camera package.
3.1.1 start orbbec_camera_node
This orbbec_camera_node is the main node for configuring device and obtaining a data stream from device. It always need to be launched with a launch file because it requires configuration with various parameters, such as image resolution, image format, etc.
Read section 3.2 for more details about launch file
-
Launch camera node
# On terminal 1 # gemini2.launch.py is a predefined launch file for Orbbec Gemini 2, see below for more details ros2 launch orbbec_camera gemini2.launch.py -
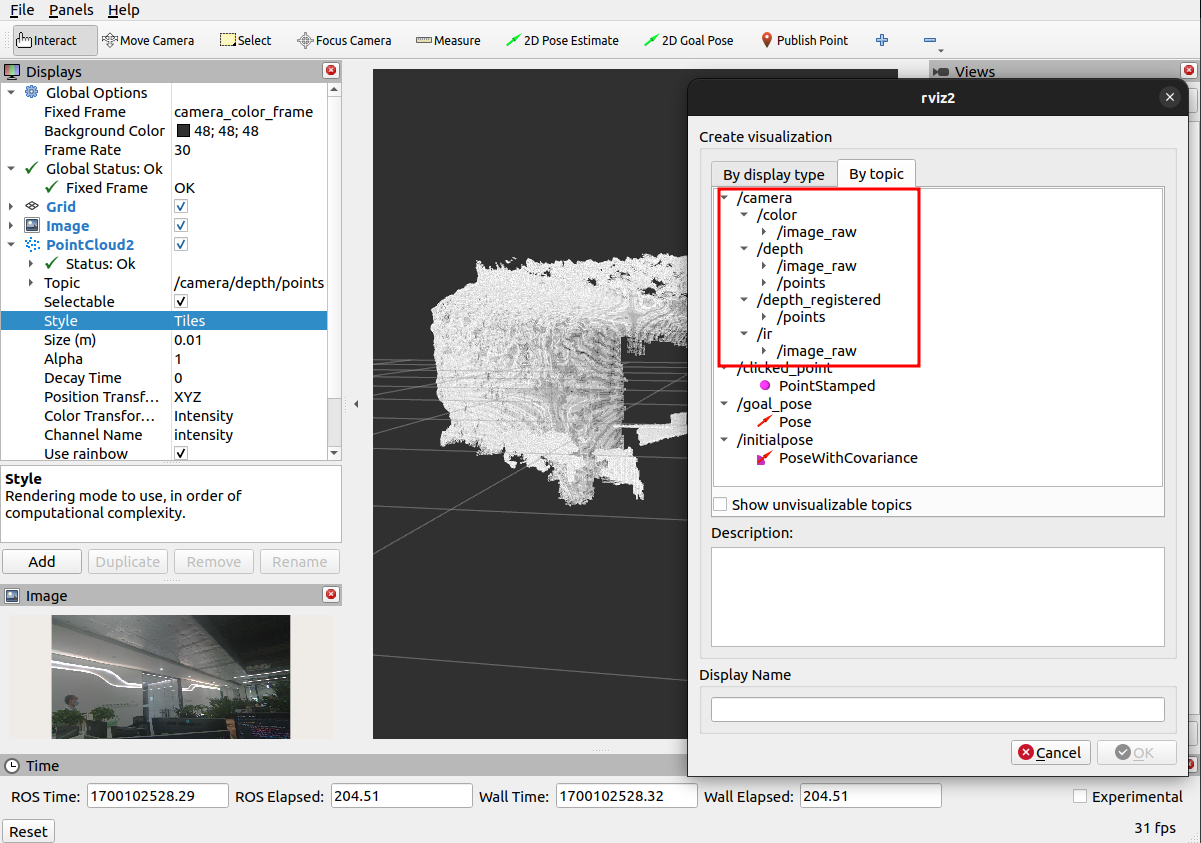
Launch rviz2 to view stream
  # On terminal 2
  rviz2
After launching rviz2, go to the Displays tab and add/camera/depth/points/PointCloud2 or any other relevant topics. Then, you will be able to see the stream.
3.1.2 Use Other nodes to get useful information
-
list_devices_node: used to list all connected devices and print out the information of each device.# make should you device has been connected and has not been open by other node before run this. ros2 run orbbec_camera list_devices_node -
list_camera_profile_mode_node: used to list all supported cameras and profiles (resolution, frame rate, image format) of the default device (the first device enumerated).# make should you device has been connected and has not been open by other node before run this. ros2 run orbbec_camera list_camera_profile_mode_node -
list_depth_work_mode_node: For some models (Gemini 2, Gemini 2L, and Gemini 2 XL), there are multiple depth work modes. This node is used to list all supported depth work mode for default device (the first device enumerated).# make should you device has been connected and has not been open by other node before run this. ros2 run orbbec_camera list_depth_work_mode_node
3.2 The launch file of camera orbbec_camera_node
3.2.1 Predefined launch files for different devices
The Orbbec SDK ROS2 Wrapper supports multiple devices, each with distinct features and limitations. Crafting a launch file that works across all devices presents a challenge, and verifying its accuracy can prove difficult for users. To mitigate these issues, we offer pre-defined launch files for various devices found in the orbbec_camera/launch directory.
| products | firmware version | launch file | description |
|---|---|---|---|
| Gemini 2 | 1.4.60 /1.4.76 | gemini2.launch.py | doc |
| Gemini 2 L | 1.4.32 | gemini2L.launch.py | doc |
| Gemini 2 XL | Obox: V1.2.5 VL:1.4.54 | gemini2XL.launch.py | |
| Gemini | 3.0.18 | gemini.launch.py | |
| Gemini E | 3460 | gemini_e.launch.py | |
| Gemini E Lite | 3606 | gemini_e_lite.launch.py | |
| Femto | 1.6.7 | femto.launch.py | |
| Femto W | 1.1.8 | femto.launch.py | |
| Femto Bolt | 1.0.6 (unsupported ARM32) | femto_bolt.launch.py | |
| Femto Mega | 1.1.7 (ubuntu20.04,ubuntu22.04) | femto_mega.launch.py | |
| Astra+ | 1.0.22/1.0.21/1.0.20/1.0.19 | astra_adv.launch.py | |
| Astra Mini Pro | 1007 | astra.launch.py | |
| Astra Mini S Pro | 1.0.05 | astra.launch.py | |
| Astra 2 | 2.8.20 | astra2.launch.py | |
| DaBai | 2436 | dabai.launch.py | |
| DaBai DW | 2606 | dabai_dw.launch.py | |
| DaBai DCW | 2460 | dabai_dcw.launch.py |
Note:
- Select the compatible launch file for your device and customize it to meet your requirements, such as enabling/disabling the camera, setting the camera profile, configuring the depth work mode, and adjusting relevant parameters.
- See the description document of each device listed in the right column to obtain additional information about the corresponding launch file.
- This table presents the lowest supported firmware version for all presently supported devices.
3.2.2 What parameters contained in launch file
For orbbec_camera_node, a set of parameters have been made available to configure both the node and the device.
- All parameters and there descriptions can be found in docs/launch_file_parameters.md.
- As above section mentions, different devices have different features and limitations. It is advisable to consult the provided launch files and accompanying documentation to confirm which parameters are compatible and the appropriate values to set for your specific device.
3.3 Subscribe topics to get image and other data
The list of published topics varies based on the device and parameters used. After executing the above command with Gemini 2 attached, the subsequent list of topics will become accessible (This is a partial list. For the full list, please type ros2 topic list):
| Feature | Topic | Description | Device Model |
|---|---|---|---|
| Color | /camera/color/camera_info |
The color camera info. | Gemini2 |
| Color | /camera/color/image_raw |
The color stream image. | Gemini2 |
| Depth | /camera/depth/camera_info |
The depth camera info. | Gemini2 |
| Depth | /camera/depth/image_raw |
The depth stream image. | Gemini2 |
| IR | /camera/ir/camera_info |
The IR camera info. | Gemini2 |
| IR | /camera/ir/image_raw |
The IR stream image. | Gemini2 |
| PointCloud | /camera/depth/points |
The point cloud, only available when enable_point_cloud is true. | Gemini2 |
| PointCloud | /camera/depth_registered/points |
The colored point cloud, only available when enable_colored_point_cloud is true. | Gemini2 |
| imu | /camera/accel/sample |
The accelerometer sample data. | Gemini2 |
| imu | /camera/gyro/sample |
The gyroscope sample data. | Gemini2 |
3.4 Get/Set services on runtime
After launching the orbbec_camera_node , services can be used to control the camera in real-time and adjust its parameters.
For example:
# get color camera exposure time
ros2 service call /camera/get_color_exposure orbbec_camera_msgs/srv/GetInt32 '{}'
# set color camera exposure time
ros2 service call /camera/set_color_exposure orbbec_camera_msgs/srv/SetInt32 '{data:156}'

# List all available services
ros2 service list -t | grep camera
All available services and it’s description can be found in docs/services.md.
4.Advanced usage
4.1 Multiple devices
Using multiple devices to capture camera data from various angles and positions can offer greater diversity and information to improve the performance of application algorithms. Kindly refer to docs/multiple_devices.md for configuring and deploying multiple devices.
4.2 Use hardware decoder to decode JPEG
4.2.1 rockchip and Amlogic
Dependencies for rockchip-mpp-dev and rockchip-rga-dev, are necessary, but it should be noted that these packages may not be available on all systems, and their names may differ. Please conduct a search to determine the proper package names for your system.
Next Open CMakeLists.txt and set USE_RK_HW_DECODER to ON.
4.2.2 Nvidia Jetson
Depends on: jetson_multimedia_api,libyuv.
Open CMakeLists.txt and set USE_NV_HW_DECODER to ON.
4.3 Depth work mode switch
- The Gemini 2, Gemini 2 L, and Gemini 2 XL cameras support the depth work mode switch.
- To enable this feature, configure the depth work mode (depth_work_mode) in the corresponding xxx.launch.py file before initiating the camera.
-
The default configuration in xxx.launch.py reflects the camera’s default settings, and can be modified as needed:
# on xxx.launch.py file: DeclareLaunchArgument('depth_work_mode', default_value='') -
Specific types of camera depth work modes that are supported can be found in the comments section of the depth mode.
-
View depth work modes:
ros2 run orbbec_camera list_depth_work_mode_node
4.4 Configuration of depth NFOV and WFOV modes
For the Femto Mega and Femto Bolt devices, the NFOV (narrow field of view) and WFOV (wide field of view) modes can be set up by adjusting the resolution of the Depth and IR (infrared) sensors in the launch file. To clarify, in the launch file, depth_width, depth_height, ir_width, and ir_height refer respectively to the resolution of the Depth and IR sensors. It is important to match the frame rate and resolution of the IR sensor with that of the Depth sensor. The following chart displays the corresponding modes and resolutions.
- NFOV unbinned: 640 x 576.
- NFOV binned: 320 x 288.
- WFOV unbinned: 1024 x 1024.
- WFOV binned: 512 x 512.
4.5 DDS Tuning
The standard DDS parameters (Galactic) may not be adequate for data transmission and may result in the data stream’s frame rate being below the setup specifications.
Please refer to docs/dds_tuning.md to optimize the DDS settings.
5. Frequently Asked Questions
-
Insufficient power supply may be the cause. To prevent this, avoid connecting all cameras to the same hub and use a powered hub instead.
-
It is also plausible that the resolution is excessive. To address this, consider decreasing the resolution.
-
Why are there so many launch files here? The reason for the abundance of launch files is attributed to varying default resolutions and image formats of different cameras. To enhance usability, the launch files have been separated for each camera.
6. License
Copyright 2023 Orbbec Ltd.
Licensed under the Apache License, Version 2.0 (the “License”); you may not use this project except in compliance with the License. You may obtain a copy of the License at
http://www.apache.org/licenses/LICENSE-2.0
Unless required by applicable law or agreed to in writing, software distributed under the License is distributed on an “AS IS” BASIS, WITHOUT WARRANTIES OR CONDITIONS OF ANY KIND, either express or implied. See the License for the specificlanguage governing permissions and limitations under the License.